Growing up, I loved lumpia so much that whenever I visited my Lola (grandma), she always seemed to have a frozen batch ready to pull out and fry on the spot. Each Filipino household has its own family recipe, and this one is hers.
For more Filipino recipes that would go well with lumpia, check out my chicken adobo, pancit palabok, garlic friend rice, or beef salpicao.

Save This Recipe! 💌
Jump to:
Notes on Lumpia Ingredients
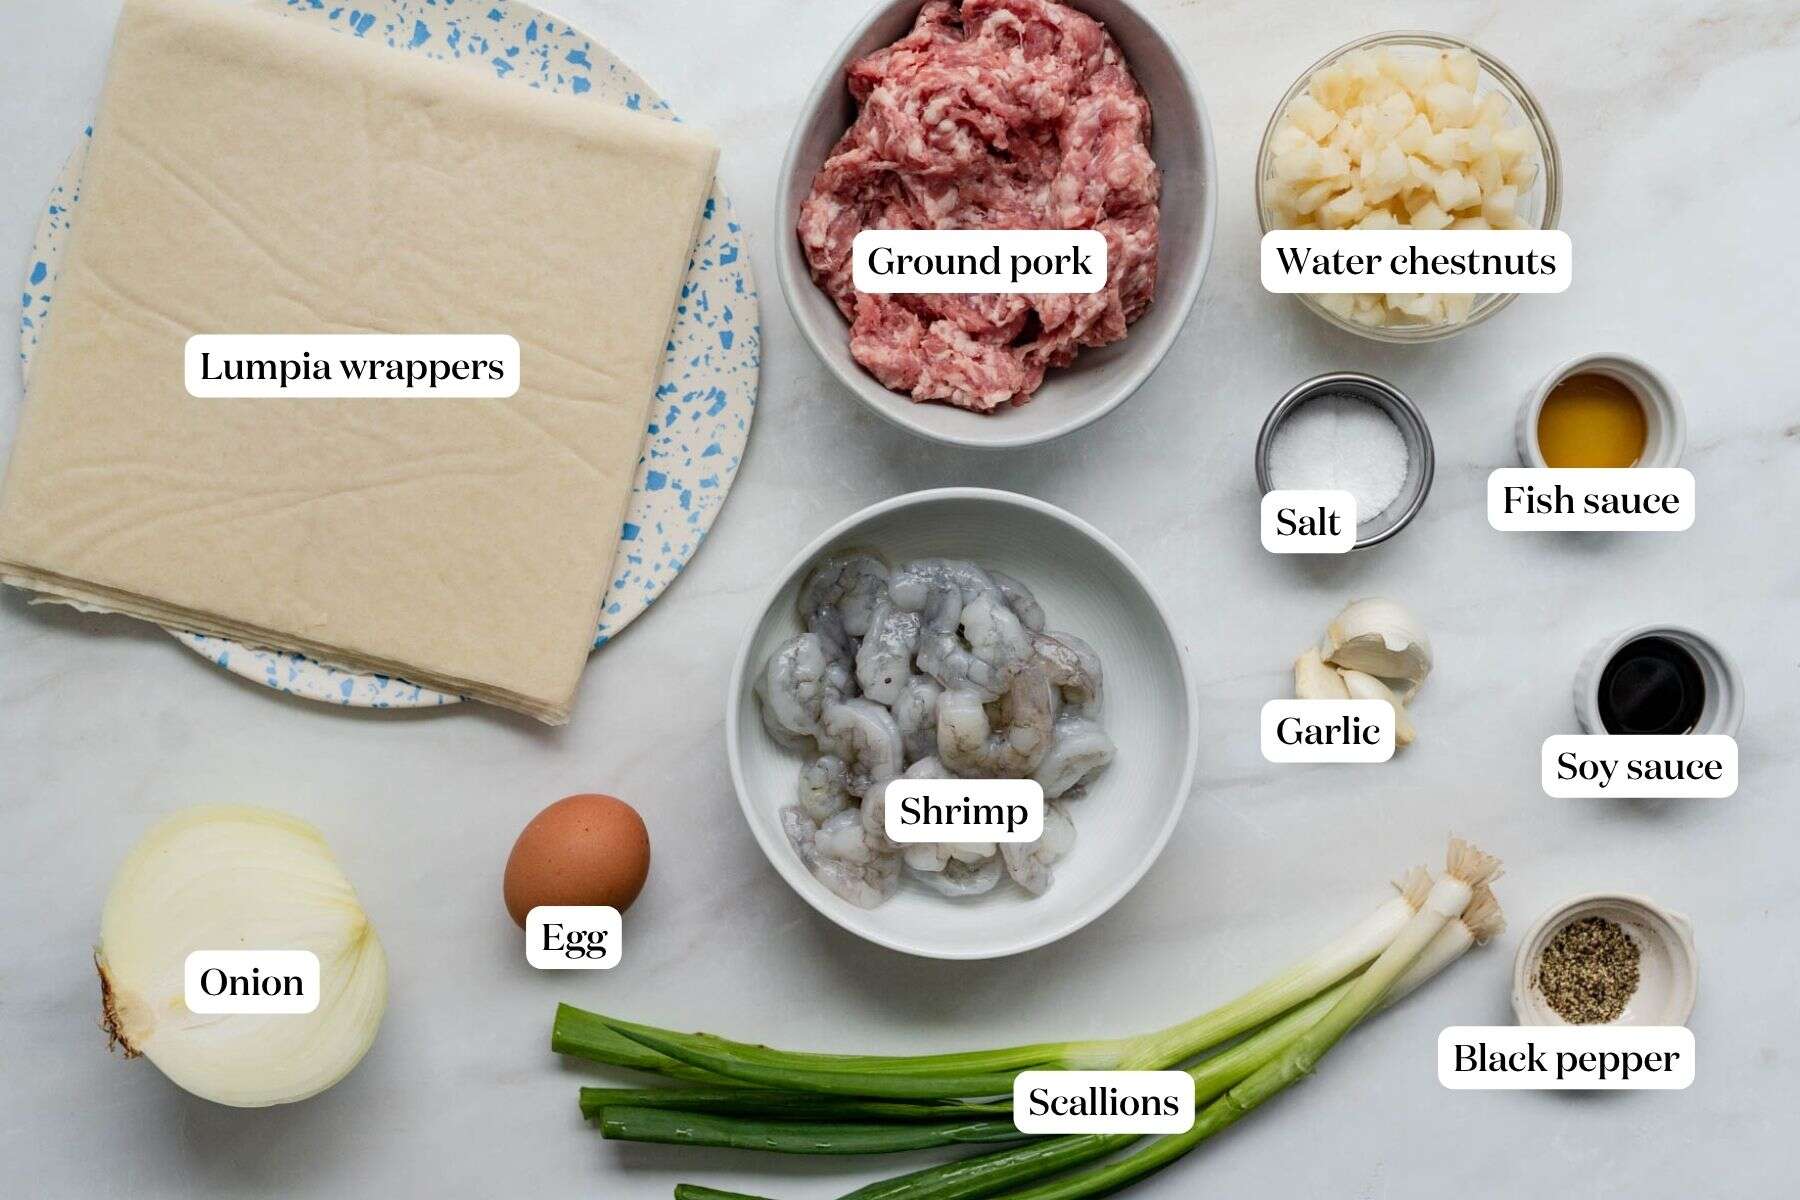
- Ground pork and ground shrimp: Most lumpia recipes use only ground pork, but my Lola always added shrimp, and I've never looked back. The shrimp adds a subtle sweetness and a deeper umami flavor to the filling. I pulse the shrimp separately in the food processor so I can control the texture. You want it finely chopped but still with a little bite, not a paste. You can use a combination of ground beef, pork and/or chicken.
- Water chestnuts: You can get this canned in the supermarket. They add a nice texture to the lumpia. Add them to the food processor to be finely chopped.
- Spring roll wrappers: You'll most likely find these in the frozen section in the supermarket. Make sure you get those labeled as spring rolls and not egg rolls wrappers because you want the lumpia wrapper to be thin. If you want to make them gluten-free, you can substitute using rice paper wrappers.
- Onion, garlic, spring onion: you can do a rough chop of these ingredients because they will be finely chopped in the food processor. If you don't have a food processor, you can chop by hand with a knife.
- Fish sauce: this is an essential ingredient to add umami to the dish.
- Soy sauce: also a key ingredient. If you want to make it gluten free, use tamari instead.
- Frying oil: I use avocado oil here for a high smoke point frying oil instead of vegetable or canola oil for a healthier option.
*see full ingredient list and quantities in recipe card.
How to Make Lumpia
Preparing and Assembling the Filling

- In a food processor, add the roughly chopped onions, scallions, garlic, water chestnuts and pulse until finely chopped. Place in a large bowl.

- Add the shrimp in the empty food processor and pulse until it's finely chopped but still has texture. (The reason we chop the shrimp separately is so that we can control how finely the shrimp is chopped).

- Add in the shrimp, pork, salt, pepper, fish sauce, soy sauce, egg in the mixing bowl with the chopped vegetables and mix with hands or a spatula. To check if you're satisfied with the flavor of the filling, do a taste test by adding some oil in a pan and pan frying about half a tablespoon of filling. Then adjust filling as needed by adding more salt, soy sauce, or fish sauce.

- Once filling is ready, fill a piping bag with the filling if you have one. An alternative would be to use a ziplock bag and cut one of the bottom corners to create your own piping bag. You can also use a spoon to scoop the filling and place it directly on the wrapper (about 1 - 1 ½ tablespoons).

- Remove the wrappers from the packaging and separate each one. With a knife, cut the wrapper diagonally so that you have 2 triangles. Cover wrappers with aluminum foil or a damp paper towel to avoid them from drying up.

- To assemble, take one triangle wrapper and pipe filling on the longer end, leaving about 1.5 inches on each side. Then fold in the 2 corners in and roll tightly. Seal the tip with egg wash. Continue until the filling runs out.
Cooking the Lumpia

- Heat your oil to 325-350°F (163-175°C) in a deep pan or pot. Once the oil is hot, gently add the lumpia making sure not to overcrowd the pan. Fry for about 2 minutes and flip and fry for another 2 minutes making sure it's golden brown. Transfer to a wire rack to cool.

- When ready to serve, cut each lumpia in half on a cutting board then transfer them on a serving plate accompanied with your desired dipping sauce.
- Place any uncooked lumpia in a ziplock bag and in the freezer for up to 3 months.
Substitutions and Variations
- Filling ingredients: We're using pork and shrimp but if you prefer you can use a mixture of ground beef/ ground pork/ ground chicken. Some recipes have carrots but not using any here because this is how my grandma used to make hers, and I'm sticking to her recipe and I honestly don't look for carrots in my lumpia!
- Wrappers: make sure to find spring roll wrappers in the frozen section of the supermarket for paper-thin lumpia wrappers. I personally don't like the egg roll wrappers because they're thicker. I haven't tried using rice paper wrappers but it would be a good substitute for a gluten free option.
Isabelle's Tips
- Don't overfill the wrapper. Add about 1 tablespoon of filling per roll is the sweet spot.
- Keep rolled lumpia covered with a damp paper towel while you work so the wrappers don't dry out.
- Fry in small batches so the oil temperature stays consistent. If the oil isn't hot enough, the wrappers absorb oil instead of crisping up . We want to fry at 325-350°F oil!
- If a wrapper tears, just wrap a second one around it. No one will know!
- Do a taste test before rolling. Fry a small piece of filling first and adjust seasoning. It also makes for a good snack 🙂
Dipping Sauce Options
Lumpia is traditionally served with a dipping sauce, and there are a few good options:
Sweet chili sauce: The most common pairing and my personal go to. You can find store bought versions at most grocery stores.
Banana ketchup: This is the classic Filipino condiment. Yes, it's ketchup made from bananas! It has a sweeter taste than ketchup.
Spiced vinegar: A more traditional Filipino dip, just white cane vinegar with garlic, a chili or two, and a pinch of salt. It's tangy, sharp, and cuts through the richness of the fried wrapper.
Make This Ahead You Won't Regret It
This is honestly one of my favorite things about lumpia. You can roll them ahead and have batches of them in the freezer for whenever you crave them.
To freeze: Place rolled (unfried) lumpia in a single layer on a baking sheet and freeze until solid, about 1-2 hours. Transfer to a ziplock bag with as much air removed as possible. They keep well for up to 2 months.
To fry from frozen: No need to thaw! Place the frozen lumpia directly into hot oil.
To store cooked lumpia: If you have leftovers (unlikely in my opinion!), keep them in an airtight container in the fridge for up to 3 days.
To make the filling ahead: You can make the filling a day in advance and keep it covered in the fridge. Assemble and roll the day you're serving them.

Did you try this recipe?
Would love to hear what you think by leaving a comment below and sharing it on Instagram, Facebook, or Pinterest!
Thanks so much!
Isabelle

Lumpia (Filipino Spring Rolls)
Equipment
- 1 Food processor (if you don't have one you can use your knife to finely chop)
- 1 piping bag (or ziplock)
- 1 frying pan or cast iron
- 1 tongs
Ingredients
- 1 small onion (or half of a large onion) roughly chopped
- 3 stalks scallions roughly chopped
- 1 can water chestnuts (8 oz)
- 3 garlic cloves
- ½ lb shrimp peeled and deveined
- 1 lb ground pork
- 2 eggs
- 1 ¼ teaspoon salt
- 2 teasppons fish sauce
- 2 teaspoons soy sauce
- ¼ teaspoon black pepper
- 1 pack spring roll wrapper (~25 pieces 8 inches)
- ¼ cup avocado oil
Instructions
Prepare the Filling:
- In a food processor, add the roughly chopped onions, scallions, garlic, water chestnuts and pulse until finely chopped. Place in a large bowl.1 small onion (or half of a large onion), 3 stalks scallions, 1 can water chestnuts (8 oz), 3 garlic cloves
- Add the shrimp in the empty food processor and pulse until it's finely chopped but still has texture. (The reason we chop the shrimp separately is so that we can control how finely the shrimp is chopped).½ lb shrimp
- Add in the shrimp, pork, salt, pepper, fish sauce, soy sauce, egg in the mixing bowl with the chopped vegetables and mix with hands or a spatula. To check if you're satisfied with the flavor of the filling, do a taste test by adding some oil in a pan and pan frying about half a tablespoon of filling. Then adjust filling as needed by adding more salt, soy sauce, or fish sauce.½ lb shrimp, 1 lb ground pork, 1 ¼ teaspoon salt, 2 teasppons fish sauce, 2 teaspoons soy sauce, ¼ teaspoon black pepper, 2 eggs
- Once filling is ready, fill a piping bag with the filling if you have one. An alternative would be to use a ziplock bag and cut one of the bottom corners to create your own piping bag. You can also use a spoon to scoop the filling and place it directly on the wrapper (about 1 - 1 ½ tablespoons).1 pack spring roll wrapper (~25 pieces 8 inches)
Assembling the lumpia:
- Remove the wrappers from the packaging and separate each one. With a knife, cut the wrapper diagonally so that you have 2 triangles. Cover wrappers with aluminum foil or a damp paper towel to avoid them from drying up.
- To assemble, take one triangle wrapper and pipe filling on the longer end, leaving about 1.5 inches on each side. Then fold in the 2 corners in and roll tightly. Seal the tip with egg wash. Continue until the filling runs out.2 eggs
Cooking steps:
- Heat your oil to 325-350°F (163-175°C) in a deep pan or pot. Once the oil is hot, gently add the lumpia making sure not to overcrowd the pan. Fry for about 2 minutes and flip and fry for another 2 minutes making sure it's golden brown. Transfer to a wire rack to cool.¼ cup avocado oil
- When ready to serve, cut each lumpia in half on a cutting board then transfer them on a serving plate accompanied with your desired dipping sauce.
- Place any uncooked lumpia in a ziplock bag and in the freezer for up to 3 months.
Save This Recipe! 💌
Notes
- Don't overfill the wrapper. Add about 1 tablespoon of filling per roll is the sweet spot.
- Keep rolled lumpia covered with a damp paper towel while you work so the wrappers don't dry out.
- Fry in small batches so the oil temperature stays consistent. If the oil isn't hot enough, the wrappers absorb oil instead of crisping up . We want to fry at 325-350°F oil!
- If a wrapper tears, just wrap a second one around it. No one will know!
- Do a taste test before rolling. Fry a small piece of filling first and adjust seasoning. It also makes for a good snack 🙂


Amanda says
I am interested in trying this recipe. The ingredient list in the recipe card does not include the soy sauce or fish sauce. How much of these are supposed to be used? Also, the black pepper is listed as 1.4 teaspoons what is this supposed to be? I am looking forward to trying this as I enjoy trying new foods.
Newel Tasting Table says
Hi Amanda! Thank you for flagging this 🙂 We just modified the ingredients in the recipe card to include the full list of ingredients. Hope you love this recipe. Feel free to reach out with any questions. Thanks for your feedback!